Codebase 101
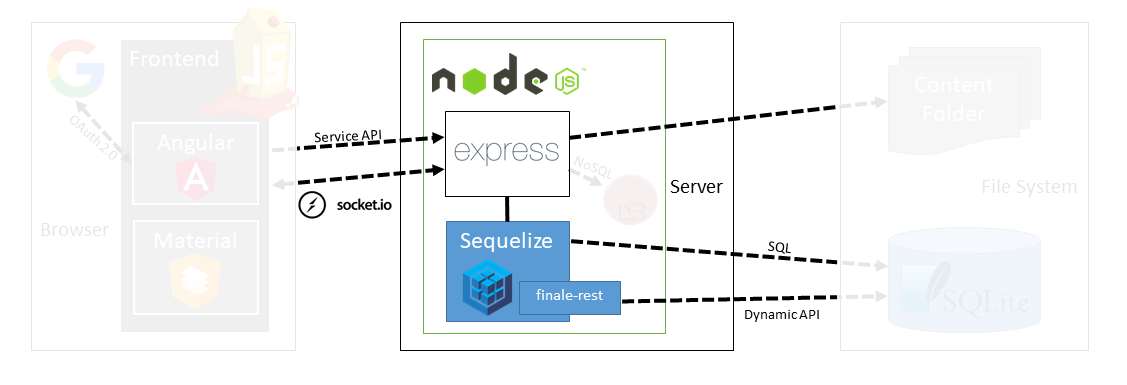
Jumping head first into any foreign codebase can cause a little headache. This section is there to help you find your way through the code of OWASP Juice Shop. On its top level the Juice Shop codebase is mainly separated into a client and a server tier, the latter with an underlying lightweight database and file system as storage.
Client Tier
OWASP Juice Shop uses the popular Angular framework as the core of its client-side. Thanks to Angular Material - an Angular-specific implementation of Google's Material Design - the UI looks nicely familiar and is easy to use. It is also built to be responsive with the help of Angular Flex-Layout, letting it adapt nicely to different screen sizes. The various icons used throughout the frontend are from the vast Font Awesome 5 collection.
ℹ️ Please note that all client-side code is written in Typescript which is compiled into regular JavaScript during the build process.

Services
Service is a broad category encompassing any value, function, or feature that an app needs. A service is typically a class with a narrow, well-defined purpose. It should do something specific and do it well.
Angular distinguishes components from services to increase modularity and reusability. By separating a component's view-related functionality from other kinds of processing, you can make your component classes lean and efficient.1
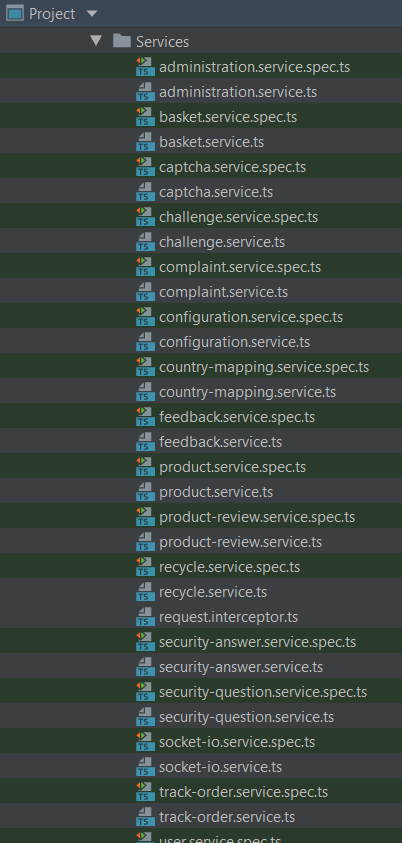
The client-side Angular services reside in the
frontend/src/app/Services folder. Each service file handles all
RESTful HTTP calls to the Node.js backend for a specific domain entity
or functional aspect of the application.
Service functions must always use Angular's own HttpClient to make
any backend calls.
The following code snippet shows how all services in the OWASP Juice
Shop client are structured using the example of FeedbackService. It
wraps the /api/Feedback API which offers a GET, POST and DELETE
endpoint to find, create and delete Feedback of users:
import { environment } from '../../environments/environment'
import { Injectable } from '@angular/core'
import { HttpClient } from '@angular/common/http'
import { catchError, map } from 'rxjs/operators'

@Injectable({
  providedIn: 'root'
})
export class FeedbackService {

  private hostServer = environment.hostServer
  private host = this.hostServer + '/api/Feedbacks'

  constructor (private http: HttpClient) { }

  find (params?: any) {
    return this.http.get(this.host + '/' , {
      params: params
    }).pipe(map((response: any) => response.data), catchError((err) => {
      throw err
    }))
  }

  save (params) {
    return this.http.post(this.host + '/', params).pipe(map((response: any) =>
      response.data), catchError((err) => { throw err }))
  }

  del (id) {
    return this.http.delete(this.host + '/' + id).pipe(map((response: any) =>
      response.data), catchError((err) => { throw err }))
  }
}
🚨 Unit tests for all services can be found next to their *.service.ts
files in the frontend/src/app/Services folder as *.service.spec.ts
files. They are Jasmine 2 specifications
which are executed by the Karma test
runner.
Components
A component controls a patch of screen called a view.
[...]
You define a component's application logic—what it does to support the view—inside a class. The class interacts with the view through an API of properties and methods.2
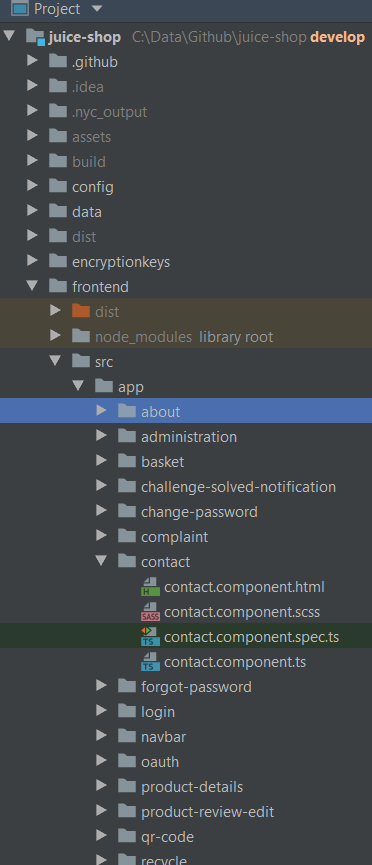
The Angular components reside inside frontend/src/app as a subfolder
for each individual component. Each component is responsible for one
screen portion of the application. It consists of the component itself
(*.component.ts) and the HTML Template
(*.component.html) along with its styles (*.component.scss).
Components must always go through one or more Services when communicating with the application backend.
The code snippet below shows the ContactComponent which handles the
Contact Us screen and uses three different services to fulfill its
tasks:
UserServiceto retrieve data about the currently logged in user (if applicable) via thewhoAmi()functionCaptchaServiceto retrieve a new CAPTCHA for the user to solve via thegetCaptcha()functionFeedbackServiceto eventuallysave()the user feedback
☝️ As a universal rule for the entire Juice Shop codebase, unnecessary
code duplication as well as deeply nested 🍝-code should be avoided by
using well-named & small helper functions. This is demonstrated by the
very simple getNewCaptcha() and resetForm() functions in the code
snippet below. Helper functions should always be located as close to the
calling code as possible.
import { FeedbackService } from '../Services/feedback.service'
import { CaptchaService } from '../Services/captcha.service'
import { UserService } from '../Services/user.service'
import { FormControl, Validators } from '@angular/forms'
import { Component, OnInit } from '@angular/core'
import { library, dom } from '@fortawesome/fontawesome-svg-core'
import { faPaperPlane, faStar } from '@fortawesome/free-solid-svg-icons'

library.add(faStar, faPaperPlane)
dom.watch()

@Component({
  selector: 'app-contact',
  templateUrl: './contact.component.html',
  styleUrls: ['./contact.component.scss']
})
export class ContactComponent implements OnInit {

  public authorControl: FormControl =
    new FormControl({ value: '', disabled: true }, [])
  public feedbackControl: FormControl =
    new FormControl('', [Validators.required, Validators.maxLength(160)])
  public captchaControl: FormControl =
    new FormControl('', [Validators.required])
  public userIdControl: FormControl = new FormControl('', [])
  public rating: number = 0
  public feedback: any = undefined
  public captcha: any
  public captchaId: any
  public confirmation: any
  public error: any

  constructor (
    private userService: UserService,
    private captchaService: CaptchaService,
    private feedbackService: FeedbackService) { }

  ngOnInit () {
    this.userService.whoAmI().subscribe((data: any) => {
      this.feedback = {}
      this.userIdControl.setValue(data.id)
      this.feedback.UserId = data.id
      this.authorControl.setValue(data.email || 'anonymous')
    }, (err) => {
      this.feedback = undefined
      console.log(err)
    })
    this.getNewCaptcha()
  }

  getNewCaptcha () {
    this.captchaService.getCaptcha().subscribe((data: any) => {
      this.captcha = data.captcha
      this.captchaId = data.captchaId
    }, (err) => err)
  }

  save () {
    this.feedback.captchaId = this.captchaId
    this.feedback.captcha = this.captchaControl.value
    this.feedback.comment = this.feedbackControl.value
    this.feedback.rating = this.rating
    this.feedback.UserId = this.userIdControl.value
    this.feedbackService.save(this.feedback).subscribe((savedFeedback) => {
      this.error = null
      this.confirmation = 'Thank you for your feedback' +
        (savedFeedback.rating === 5 ? ' and your 5-star rating!' : '.')
      this.feedback = {}
      this.ngOnInit()
      this.resetForm()
    }, (error) => {
      this.error = error.error
      this.confirmation = null
      this.feedback = {}
      this.resetForm()
    })
  }

  resetForm () {
    this.authorControl.markAsUntouched()
    this.authorControl.markAsPristine()
    this.authorControl.setValue('')
    this.feedbackControl.markAsUntouched()
    this.feedbackControl.markAsPristine()
    this.feedbackControl.setValue('')
    this.captchaControl.markAsUntouched()
    this.captchaControl.markAsPristine()
    this.captchaControl.setValue('')
  }

}
🚨 Unit tests for all components can be found in their subfolders within
frontend/src/app/ as *.component.spec.ts files. They are
Jasmine 2 specifications which are executed
by the Karma test runner.
Templates
The Angular application manages what the user sees and can do, achieving this through the interaction of a component class instance (the component) and its user-facing template.
You may be familiar with the component/template duality from your experience with model-view-controller (MVC) or model-view-viewmodel (MVVM). In Angular, the component plays the part of the controller/viewmodel, and the template represents the view.3
Each screen within the application is defined in a HTML view template
along with its Component in the subfolders beneath
frontend/src/app/. The views are written as HTML using
Angular Material for styling and
Angular Flex-Layout for
responsiveness. Furthermore most views incorporate icons from the
Font Awesome 5 collection.
ℹ️ Understanding the Declarative HTML APIs of the Angular Layout is crucial to be able to write UI elements or entire screens without breaking responsiveness!
The following code snippet shows the contact.component.html view which
- together with the previously shown ContractComponent class and its
associated styles in contact.component.scss - represents the entire
Contact Us screen.
<div fxLayoutAlign="center">
<mat-card>
<h3 translate>TITLE_CONTACT</h3>
<div *ngIf="confirmation">
<p class="confirmation">{{confirmation}}</p>
</div>
<div *ngIf="error">
<p class="error">{{error}}</p>
</div>
<div class="form-container">
<input hidden type="text" id="userId" [formControl]="userIdControl"/>
<mat-form-field appearance="outline">
<mat-label translate>LABEL_AUTHOR</mat-label>
<input [formControl]="authorControl" matInput type="text">
</mat-form-field>
<mat-form-field appearance="outline">
<mat-label translate>LABEL_COMMENT</mat-label>
<textarea id="comment" [formControl]="feedbackControl" matInput></textarea>
<mat-error *ngIf="feedbackControl.invalid && feedbackControl.errors.required" translate>
MANDATORY_COMMENT
</mat-error>
</mat-form-field>
<div style="margin-top:5px;" class="rating-container">
<label style="font-weight:bold; margin-right: 8px;" translate>
LABEL_RATING
</label>
<bar-rating [(rate)]="rating" [max]="5"></bar-rating>
</div>
<mat-form-field>
<label style="font-weight:bold;" translate>LABEL_CAPTCHA</label>
<code id="captcha">{{captcha}}</code> <label>?</label>
<input id="captchaControl" [formControl]="captchaControl" matInput type="text">
<mat-error *ngIf="captchaControl.invalid && captchaControl.errors.required" translate>
MANDATORY_CAPTCHA
</mat-error>
</mat-form-field>
</div>
<button type="submit" id="submitButton" style="margin-top:5px;"
mat-raised-button color="primary"
[disabled]="authorControl.invalid || feedbackControl.invalid || captchaControl.invalid || !rating"
(click)="save()">
<i class="fas fa-paper-plane fa-lg"></i> {{'BTN_SUBMIT' | translate}}
</button>
</mat-card>
</div>
ℹ️ In the entire Juice Shop code base, inline templates are never
used. Templates must always be described in separate .html files.
Internationalization
All static texts in the user interface are fully internationalized using
the ngx-translate module. Texts coming from the server (e.g. product
descriptions or server error messages) are always in English.
No hard-coded texts are allowed in any of the Templates or
Components. Instead, property keys have to be defined and
are usually applied with a translate attribute that can be placed in
most HTML tags. You might have noticed several of these translate
attributes in the contact.component.html code snippet from the
Templates section.
The different translations are maintained in JSON files in the
/frontend/src/assets/i18n folder. The only file that is allowed to be
touched by developers is the en.json file for the original English
texts. New properties are exclusively added here. When pushing the
develop branch to GitHub, the online translation provider will pick up
changes in en.json and adapt all other language files accordingly. All
this happens behind the scenes in a distinct branch l10n_develop which
will be manually merged back into develop on a regular basis.
To learn about the actual translation process please refer to the chapter Helping with translations.
Client-side code compilation
All client side Angular code is compiled into JavaScript and afterwards
uglified (for
security by obscurity)
and minified (for initial load time reduction) during the build
process (launched with npm install) of the application. This creates
an frontend/dist/frontend folder, which is the one actually delivered
to the Browser to load all application-specific client-side code.
ℹ️ If you want to quickly test client-side code changes, it can be
cumbersome and slow to launch npm install over and over again. Instead
you can use npm run serve to keep let Angular watch for client-code
changes and recompile the affected parts on the fly. You usually not
even have to manually refresh your browser with F5 to see your
changes.
Server Tier
The backend of OWASP Juice Shop is a Node.js
application based on the Express web framework.
Before v12.7.0 the backend code base was JavaScript (ES6), but since
then it has been gradually migrated into TypeScript.
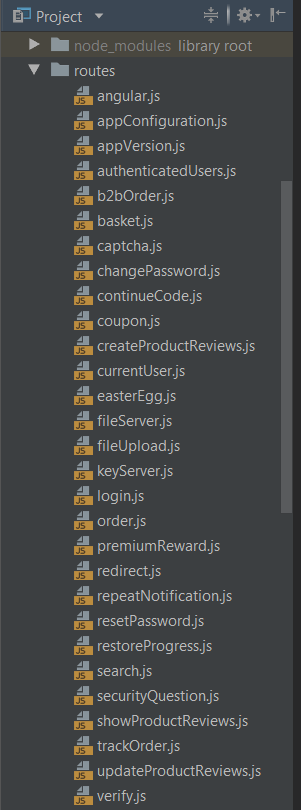
Routes
Routing refers to determining how an application responds to a client request to a particular endpoint, which is a URI (or path) and a specific HTTP request method (GET, POST, and so on).
Each route can have one or more handler functions, which are executed when the route is matched.4
Routes are defined via the the Express framework and can be handled by any of the following middleware:
- An automatically generated API endpoint for one of the exposed tables from the application's Data model
- A hand-written middleware which encapsulates some business or technical responsibility
- Some third-party middleware that fulfills a non-functional requirement
such as
- file serving (via
serve-indexandserve-favicon) - adding HTTP security headers (via
helmetandcors) - extracting cookies from HTTP requests (via
cookie-parser) - writing access logs (via
morgan) - catching unhandled exceptions and presenting a default error screen
(via
errorhandler)
- file serving (via
🚨 Integration tests for all routes can be found in the test/api
folder alongside all other API endpoint tests, from where
Frisby.js/Jest
assert the functionality of the entire backend on HTTP-request/response
level.
Generated API endpoints
Juice Shop uses the
finale-rest middleware to
automatically create REST endpoints for most of its Sequelize models.
For e.g. the User model the generated endpoints are:
/api/UsersacceptingGETrequests to retrieve all (or a filtered list of) user records- and
POSTrequests to create a new user record
/api/Users/{id}acceptingGETrequests to retrieve a single user record by its database IDPATCHrequests to update a user recordDELETErequests to delete a user record
Apart from the User model also the Product, Feedback,
BasketItem, Challenge, Complaint, Recycle, SecurityQuestion, SecurityAnswer, Address, PrivacyRequest, Card and Quantity models are exposed in this fashion.
Not all HTTP verbs are accepted by every endpoint. Furthermore, some endpoints are protected against anonymous access and can only be used by an authenticated user. This is described later in section Access control on routes.
finale.initialize({ app, sequelize })

const autoModels = [
  { name: 'User', exclude: ['password', 'totpSecret'], model: UserModel },
  { name: 'Product', exclude: [], model: ProductModel },
  { name: 'Feedback', exclude: [], model: FeedbackModel },
  { name: 'BasketItem', exclude: [], model: BasketItemModel },
  { name: 'Challenge', exclude: [], model: ChallengeModel },
  { name: 'Complaint', exclude: [], model: ComplaintModel },
  { name: 'Recycle', exclude: [], model: RecycleModel },
  { name: 'SecurityQuestion', exclude: [], model: SecurityQuestionModel },
  { name: 'SecurityAnswer', exclude: [], model: SecurityAnswerModel },
  { name: 'Address', exclude: [], model: AddressModel },
  { name: 'PrivacyRequest', exclude: [], model: PrivacyRequestModel },
  { name: 'Card', exclude: [], model: CardModel },
  { name: 'Quantity', exclude: [], model: QuantityModel }
]

for (const { name, exclude, model } of autoModels) {
  const resource = finale.resource({
    model,
    endpoints: [`/api/${name}s`, `/api/${name}s/:id`],
    excludeAttributes: exclude
  })
  // ...
}
Hand-written middleware
The business functionality in the application backend is separated into
tightly scoped middleware components which are placed in the routes
folder.
These middleware components are directly mapped to Express routes.
Each middleware exposes a single function which encapsulates their
responsibility. For example, the angular.ts middleware delivers the
index.html page to the client:
import path = require('path')
import { Request, Response, NextFunction } from 'express'

const utils = require('../lib/utils')

module.exports = function serveAngularClient () {
  return ({ url }: Request, res: Response, next: NextFunction) => {
    if (!utils.startsWith(url, '/api') && !utils.startsWith(url, '/rest')) {
      res.sendFile(path.resolve('frontend/dist/frontend/index.html'))
    } else {
      next(new Error('Unexpected path: ' + url))
    }
  }
}
If a hand-written middleware is involved in a hacking challenge, it must
assess on its own if the challenge has been solved. For example, in the
basket.ts middleware where successfully accessing another user's
shopping basket is verified in the utils.solveIf() function call:
import { Request, Response, NextFunction } from 'express'
import { ProductModel } from '../models/product'
import { BasketModel } from '../models/basket'

const utils = require('../lib/utils')
const security = require('../lib/insecurity')
const challenges = require('../data/datacache').challenges

module.exports = function retrieveBasket () {
  return (req: Request, res: Response, next: NextFunction) => {
    const id = req.params.id
    BasketModel.findOne({ where: { id }, include: [{ model: ProductModel, paranoid: false, as: 'Products' }] })
            .then((basket: BasketModel | null) => {
              /* jshint eqeqeq:false */
              utils.solveIf(challenges.basketAccessChallenge, () => {
                const user = security.authenticatedUsers.from(req)
                return user && id && id !== 'undefined' && id !== 'null' && id !== 'NaN' && user.bid && user.bid != id // eslint-disable-line eqeqeq
              })
              if (basket?.Products && basket.Products.length > 0) {
                for (let i = 0; i < basket.Products.length; i++) {
                  basket.Products[i].name = req.__(basket.Products[i].name)
                }
              }

              res.json(utils.queryResultToJson(basket))
            }).catch((error: Error) => {
      next(error)
    })
  }
}
One particular middleware deviating from above approach is verify.ts.
It contains no business functionality. Instead of one function it
exposes several named functions on challenge verification for
Generated API endpoints, for example:
app.post('/api/Feedbacks', verify.forgedFeedbackChallenge())
app.post('/api/Feedbacks', verify.captchaBypassChallenge())
app.post('/api/Users', verify.registerAdminChallenge())
app.post('/api/Users', verify.passwordRepeatChallenge())
The same applies for any challenges on top of third-party middleware, for example:
app.use(verify.errorHandlingChallenge())
app.use(errorhandler())
Similar to the Generated API endpoints, not all hand-written endpoints can be used anonymously. The upcoming section Access control on routes explains the available authorization checks.
🚨 Unit tests for hand-written routes can be found in the test/server
folder. These tests are written using the Chai
assertion library in conjunction with the Mocha
test framework.
Access control on routes
For both the generated and hand-written middleware access can be
restricted on the corresponding routes by adding security.denyAll()
or security.isAuthorized() as an extra middleware. Examples for
denying all access to certain HTTP verbs for the SecurityQuestion and
SecurityAnswer models:
/* SecurityQuestions: Only GET list of questions allowed. */
app.post('/api/SecurityQuestions', security.denyAll())
app.use('/api/SecurityQuestions/:id', security.denyAll())

/* SecurityAnswers: Only POST of answer allowed. */
app.get('/api/SecurityAnswers', security.denyAll())
app.use('/api/SecurityAnswers/:id', security.denyAll())
The following snippet show the authorization settings for the User
model which allows only POST to anonymous users (for registration) and
requires to be logged-in for retrieving the list of users or individual
user records. Deleting users is completely forbidden:
app.get('/api/Users', security.isAuthorized())
app.route('/api/Users/:id')
  .get(security.isAuthorized())
  .put(security.denyAll()) // Updating users is forbidden to make the password change challenge harder
  .delete(security.denyAll()) // Deleting users is forbidden entirely to keep login challenges solvable
Custom libraries
Two important and widely used custom libraries reside in the lib
folder, one containing useful utilities (lib/utils.ts) and the other
encapsulating many of the broken security features (lib/insecurity.js)
of the application.
Useful utilities
The main responsibility of the utils.ts module is setting challenges
as solved and sending associated notifications, optionally including a
CTF flag code. It can also retrieve any challenge by its name and check
if a passed challenge is not yet solved, to avoid unnecessary (and
sometimes expensive) repetitive solving of the same challenge.
exports.solve = function (challenge, isRestore) {
  const self = this
  challenge.solved = true
  challenge.save().then(solvedChallenge => {
    solvedChallenge.description = entities.decode(sanitizeHtml(solvedChallenge.description, {
      allowedTags: [],
      allowedAttributes: []
    }))
    console.log(colors.green('Solved') + ' challenge ' + colors.cyan(solvedChallenge.name) + ' (' + solvedChallenge.description + ')')
    self.sendNotification(solvedChallenge, isRestore)
  })
}

exports.sendNotification = function (challenge, isRestore) {
  if (!this.notSolved(challenge)) {
    const flag = this.ctfFlag(challenge.name)
    const notification = {
      name: challenge.name,
      challenge: challenge.name + ' (' + challenge.description + ')',
      flag: flag,
      hidden: !config.get('application.showChallengeSolvedNotifications'),
      isRestore: isRestore
    }
    notifications.push(notification)
    if (global.io) {
      global.io.emit('challenge solved', notification)
    }
  }
}
It also offers some basic String and Date utilities along with data
(un-)wrapper functions and a method for the synchronous file download
used during Customization.
security features
The insecurity.js module offers all security-relevant utilities of the
application, but of course mostly in some broken or flawed way:
- Hashing functions both weak (
hash()) and relatively strong (hmac()) - Route authorization via JWT with
denyAll()andisAuthorized()(see Access control on routes) and corresponding grant of permission for a users withauthorize() - HTML sanitization by exposing a (vulnerable) external library as
function
sanitizeHtml() - Keeping a bi-directional map of users with their current
authentication token (JWT) in
authenticatedUsers - Coupon code creation and verification functions
generateCoupon()anddiscountFromCoupon() - A allowlist of allowed redirect URLs and a corresponding check
function
isRedirectAllowed() - CAPTCHA verification via
verifyCaptcha()which compares the user's answer against the requested CAPTCHA from the database
Storage Tier
SQLite and MarsDB form the backbone of the Juice Shop, as an e-commerce application without storage for its product, customer and associated data would not be very realistic. The Juice Shop uses light-weight implementations on the database layer to keep it runnable as a single "all-inclusive" server which can be deployed in various ways with ease.
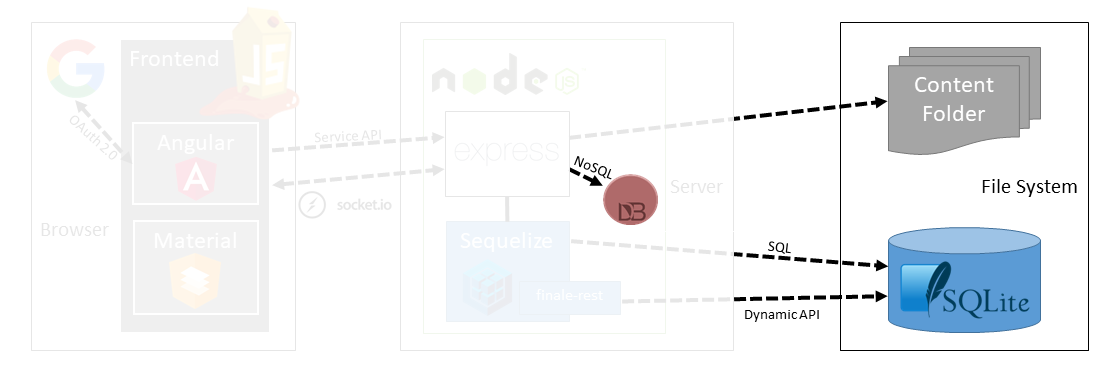
Database
For the main database of the Juice Shop the file-based
SQLite engine is used. It does not require a
separate server but is accessed directly from data/juiceshop.sqlite on
the file system of the Node.js server. For ease of use and more
flexibility the relational mapping framework
Sequelize is used to actually access the
data through a querying API. Sometime plain SQL is used as well, and of
course in an unsafe way that allows Injection.
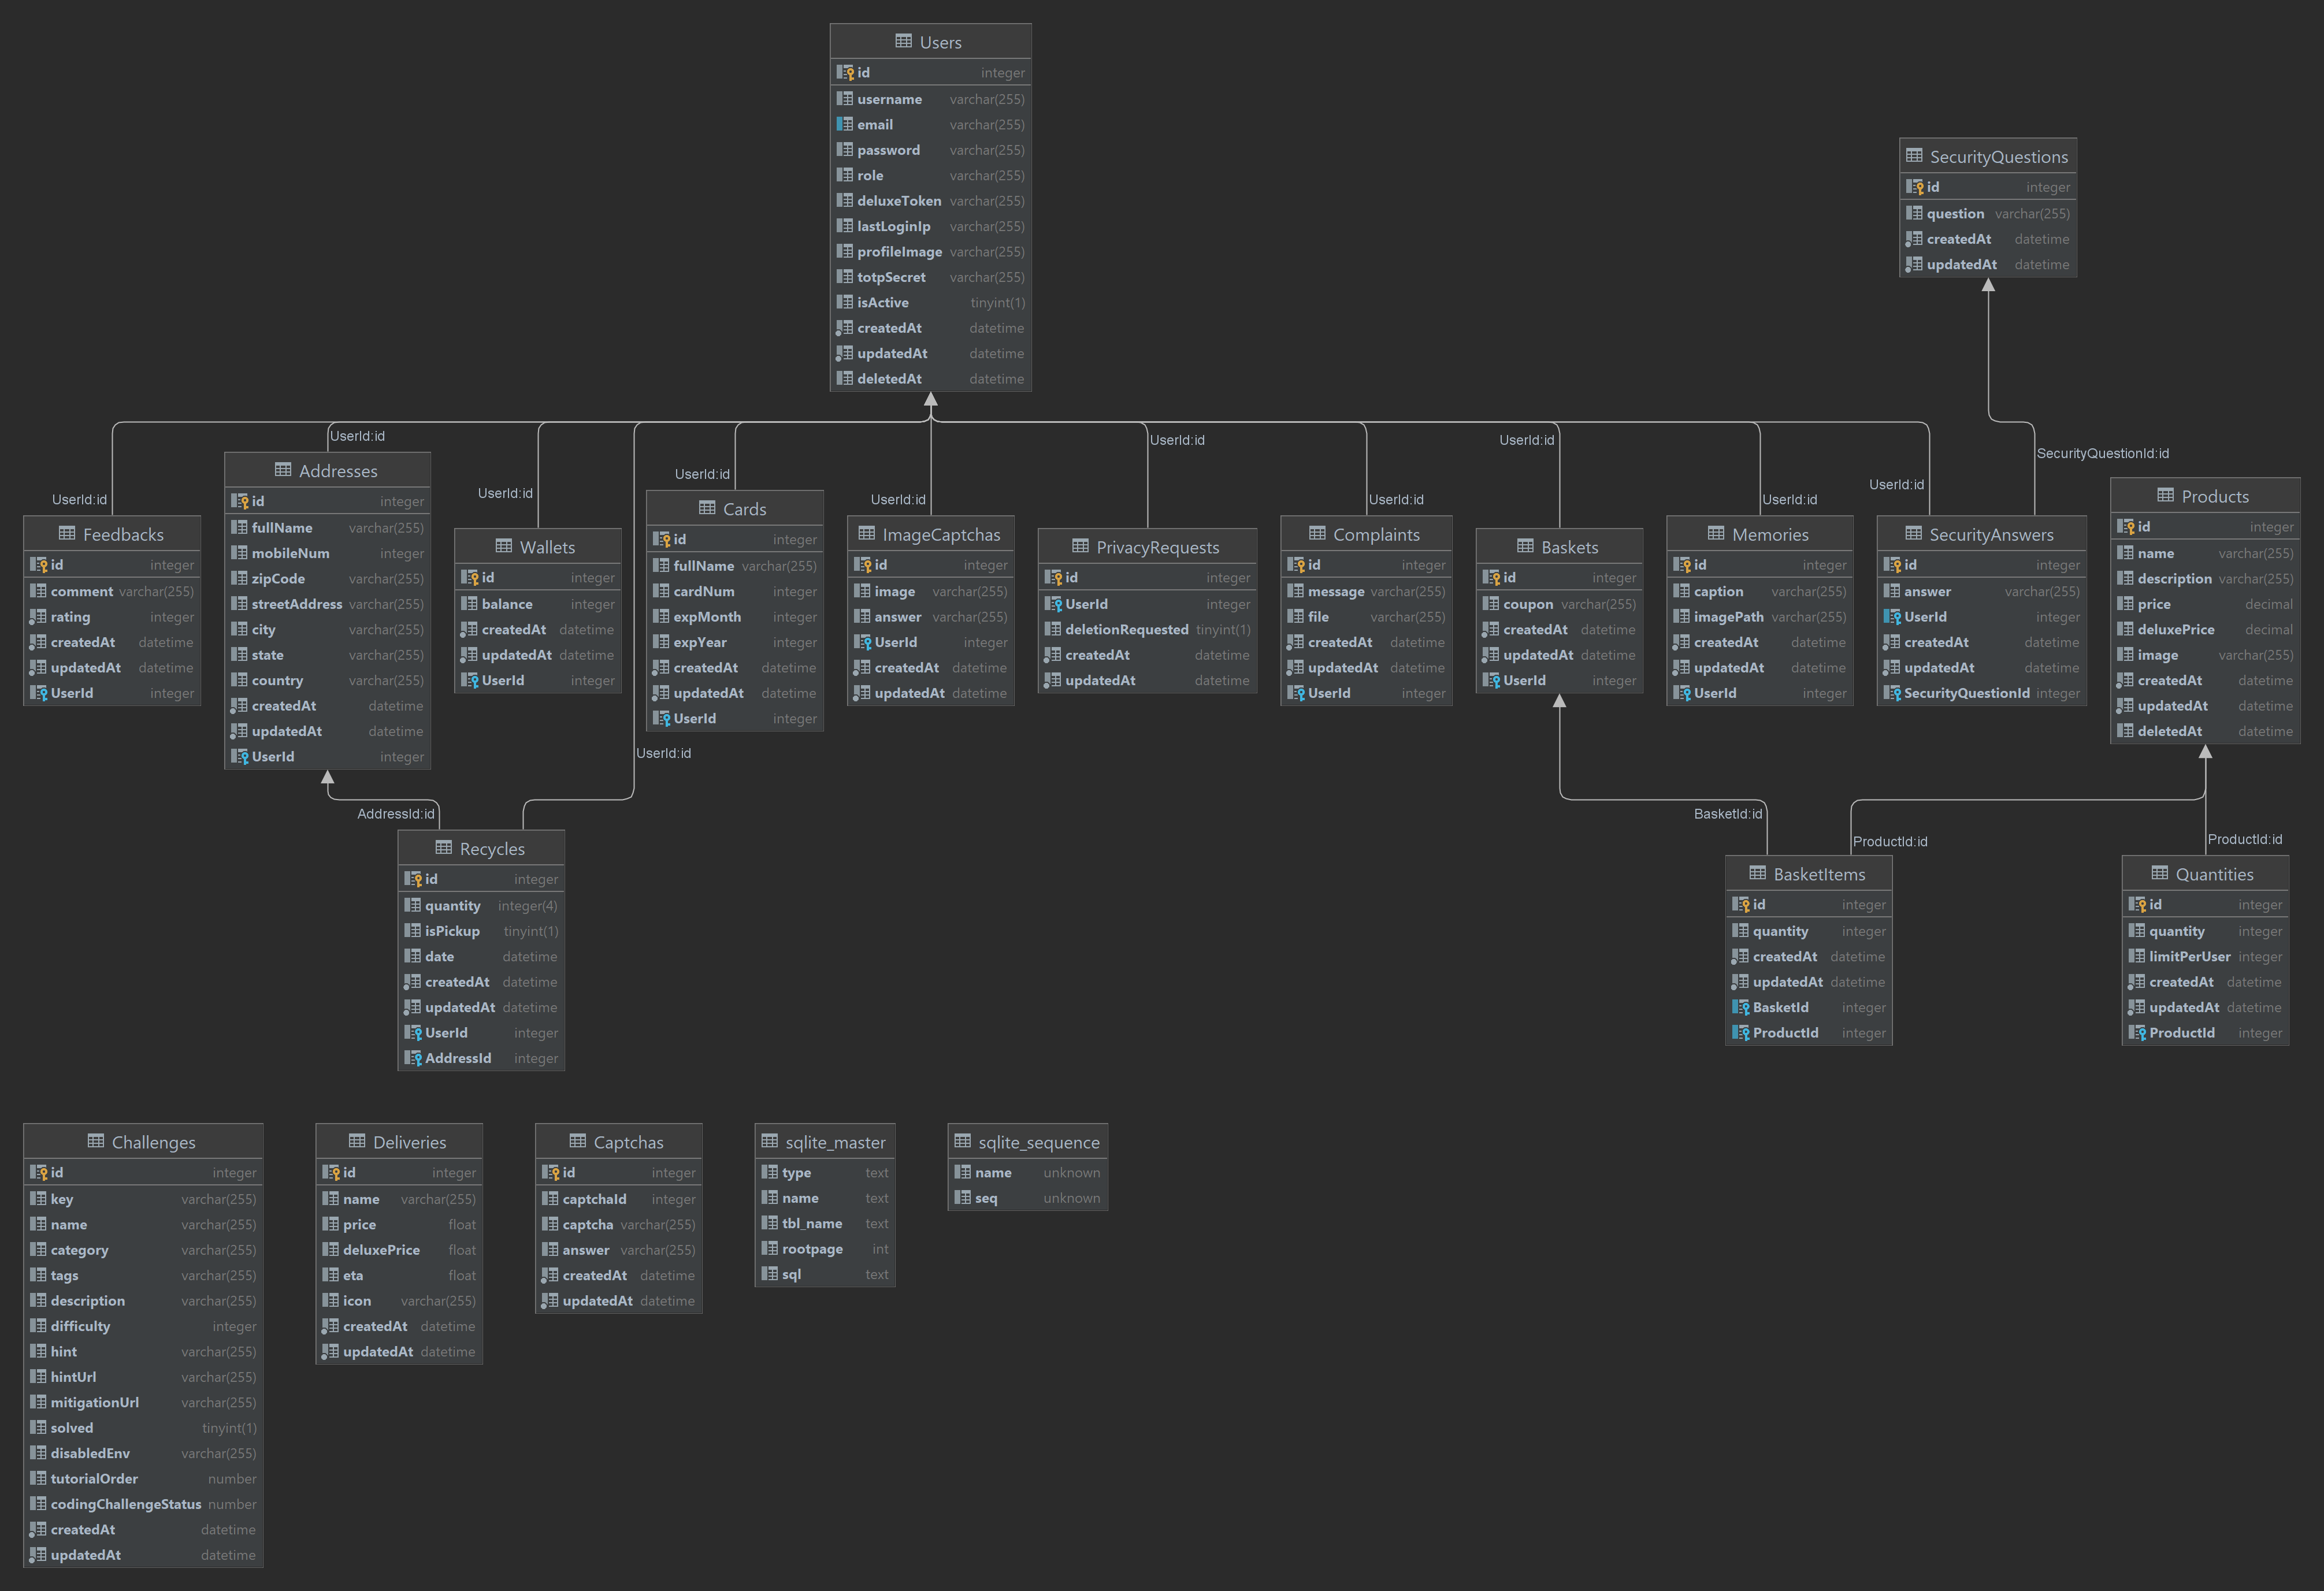
Data model
The relational data model of the Juice Shop is very straightforward. It features the following tables:
Userswhich contains all registered users (i.e. potential customers) of the web shop.- The table
SecurityQuestionscontains a fixed number of security questions a user has to choose from during registration. The provided answer is stored in the tableSecurityAnswers. - The
Productstable contains the products available in the shop including price data with their associated inventory stock data being persisted in theQuantitiestable. - When logging in every user receives a shopping basket represented by a
row in the
Basketstable. When putting products into the basket this is reflected by entries inBasketItemslinking a product to a basket together with a quantity. - Users have digital
Walletsand optionally creditCardswhich they can use to pay for orders. - Orders are shipped to user
Addressesand the delivery speed and shipping costs are determined by options stored in theDeliveriestable. - Users can interact further with the shop by
- giving feedback which is stored in the
Feedbackstable - complaining about recent orders which creates entries in the
Complaintstable - asking for fruit-pressing leftovers to be collected for recycled via
the
Recyclestable. - references to uploaded user photos and associated descriptions are stored in the
Memoriestable.
- giving feedback which is stored in the
- The tables
CaptchasandImageCaptchasstore all generated CAPTCHA questions and answers for comparison with the users response. - The
Challengestable would not be part of the data model of a normal e-commerce application, but for simplicities sake it is kept in the same schema. This table stores all hacking challenges that the OWASP Juice Shop offers and persists if the user already solved them or not.
Non-relational database
Not all data of the Juice Shop resides in a relational schema. The user's product reviews are stored in a collection reviews within a non-relational in-memory
MarsDB instance. All customer orders are also persisted in this fashion. An example user reviews entry might look like the following inside MarsDB:
{"message":"One of my favorites!","author":"admin@juice-sh.op","product":1,"_id":"PaZjAKKMaxWieSF65"}
An orders entry might look like this:
{ "orderId": "fe01-28005c57431f8587", "totalPrice": 30.92, "products": [ { "quantity": 3, "name": "Apple Juice (1000ml)", "price": 1.99, "total": 5.97, "bonus": 0 }, { "quantity": 5, "name": "Raspberry Juice (1000ml)", "price": 4.99, "total": 24.950000000000003, "bonus": 0 } ], "bonus": 0, "eta": "0" }
All interaction with MarsDB happens via the MongoDB query syntax.
Populating the databases
The OWASP Juice Shop comes with a data/datacreator.ts module that is
automatically executed on every server start after the SQLite file and
in-memory MarsDB have been cleared. It populates all tables with some
initial data which makes the application usable out-of-the-box:
module.exports = async () => {
  const creators = [
    createSecurityQuestions,
    createUsers,
    createChallenges,
    createRandomFakeUsers,
    createProducts,
    createBaskets,
    createBasketItems,
    createAnonymousFeedback,
    createComplaints,
    createRecycleItem,
    createOrders,
    createQuantity,
    createWallet,
    createDeliveryMethods,
    createMemories
  ]

  for (const creator of creators) {
    await creator()
  }
}
For the default Users along with their SecurityAnswers, Feedbacks, Addresses, Cards and Wallets the data is hard-coded in a YAML file data/static/users.yml. For the static enumerations SecurityQuestions and Deliveries as well as Juice Shop's 102 hacking Challenges, similar YAML files exist in data/static.
As the contents of
the Products and Memories table as well as the non-relational reviews collection
can be customized, they are populated based on
the active configuration file. By default, this is config/default.yml.
The data in the Basket, BasketItem, Complaints and Recycles tables is statically
defined within the datacreator.ts script. They are so simple that a
YAML declaration file seemed like overkill. The same applies for some anonymous Feedbacks entries.
The Captchas and ImageCaptchas tables remain empty on startup, as they will dynamically
generate a new CAPTCHA every time the Customer Feedback or Request Data Export pages are visited.
File system
The folder ftp contains some files which are directly accessible. When
a user completes a purchase, an order confirmation PDF is generated and
placed into this folder. Other than that the ftp folder is also used
to deliver the shop's terms of use to interested customers.
Uploaded complaint files
The File complaint page contains a file upload field to attach one of the previously mentioned order confirmation PDFs. While these are really uploaded to the server, they are not written to the file system but discarded for security reasons: Publicly hosted Juice Shop instances are not supposed to be abused as malware distribution sites or file shares.
End-to-end tests
As applications grow in size and complexity, it becomes unrealistic to rely on manual testing to verify the correctness of new features, catch bugs and notice regressions. Unit tests are the first line of defense for catching bugs, but sometimes issues come up with integration between components which can't be captured in a unit test. End-to-end tests are made to find these problems.5
The folder cypress/integration/e2e contains an extensive suite of end-to-end tests
which automatically solves every challenge in the Juice Shop
application. Whenever a new challenge is added, a corresponding
end-to-end test needs to be included, to prove that it can be exploited.
It is quite an impressive sight to see how 102 hacking challenges are solved without any human interaction in a few minutes. These tests are written and executed with Cypress which and their results and stats are posted to on a public dashboard.
1. https://angular.io/guide/architecture-services ↩
2. https://angular.io/guide/architecture-components ↩
3. https://angular.io/guide/template-syntax ↩
4. http://expressjs.com/en/starter/basic-routing.html ↩
5. https://docs.angularjs.org/guide/e2e-testing ↩